
Brown Butter Chocolate Crunch Cookies
Gluten-free
One of my favorite things about Christmas time has always been the cookies. Growing up, my mom would cover our kitchen table in newspaper, bust out her Better Homes & Gardens cookbook and bake up sugar cookies, gingerbread, chocolate crinkles and more. We would sit at that table decorating cookies (eating half the icing as we went) and making a complete mess.
Around this time of year, the fancy, seasonal cookies get all the press, but is there really anything that can beat a good old chocolate chip cookie? I think not. But, as it is the holidays, I wanted to zhoosh this one up a bit.
Per usual, let’s talk about few bits and bobs in these cookies which make them particularly tasty.
Gluten-Free Flour Mix
When it comes to baking, it is not always easy to make things gluten-free. There are many great mixes out there that are one-to-one replacements for wheat flour. I tend to use them sparingly as they usually contain gums which my stomach does not always like. Also, making your own gluten-free flour mix is not all that hard as long as you use the right mix of flours.
I have one gluten-free mix that I use just for cookies and it contains just three ingredients: oat flour, teff flour and potato starch. Oat and teff flours both has a nutty flavor (not to mention healthy fiber and protein), however, on their own, they will not give you the ideal cookie texture. Potato starch is the last piece in this trifecta. The starch mimics gluten by providing structure and chew to the cookies.
To make this flour mix: combine 1 cup (160g) oat flour, 1/2 cup (76g) teff flour and 1/2 cup (88g) potato starch. Whisk together and store in an airtight container in the fridge. I typically do double this amount and use it for most cookies, brownies and blondies.
For all these flours, I buy them directly from Bob’s Red Mill, but they can be found at super markets or online from Amazon, Thrive Market or jet.com.
Molasses
Molasses is not just for gingerbread. Molasses is actually a great addition to many cookies because it adds a slight bitterness, rich color and acidity. The molasses in this cookie will not punch you in the face with flavor, but it pairs so nicely with the nutty brown butter.
Adding molasses to this cookie recipe helps with the chew factor too. Most chocolate chip cookies call for a mixture of granulated and brown cane sugar. Brown sugar has molasses added to it. Using coconut sugar as the sweetener in these cookies, adding molasses helps to bring more moisture to the dough and give that brown-sugar-like flavor to the cookie.
If you are not a fan of molasses, then add the same amount of maple syrup or date syrup to the dough.
Tahini
It’s no secret that I love tahini. It really is a brilliant base to a cookie because it has a natural nuttiness (ironically since it is a seed butter), oodles of natural oil and a slight savory flavor. In this case, tahini amplifies the nutty flavor of the brown butter as well as providing additional fat. When you brown butter, you lose a bit of the moisture from the butter (hence why a 113g stick of butter yields only 90g of brown butter). You want to get that moisture back. Sure, you could add more butter back, but why not add something that has a little more inherent flavor, hello tahini.
As I have said before, not all tahinis are the same. Some can be very bitter and assertive. I always use Soom Foods’ tahini since it has a smooth flavor, is easy to stir and is women-founded. Whole Foods 365 brand tahini is also a good choice.
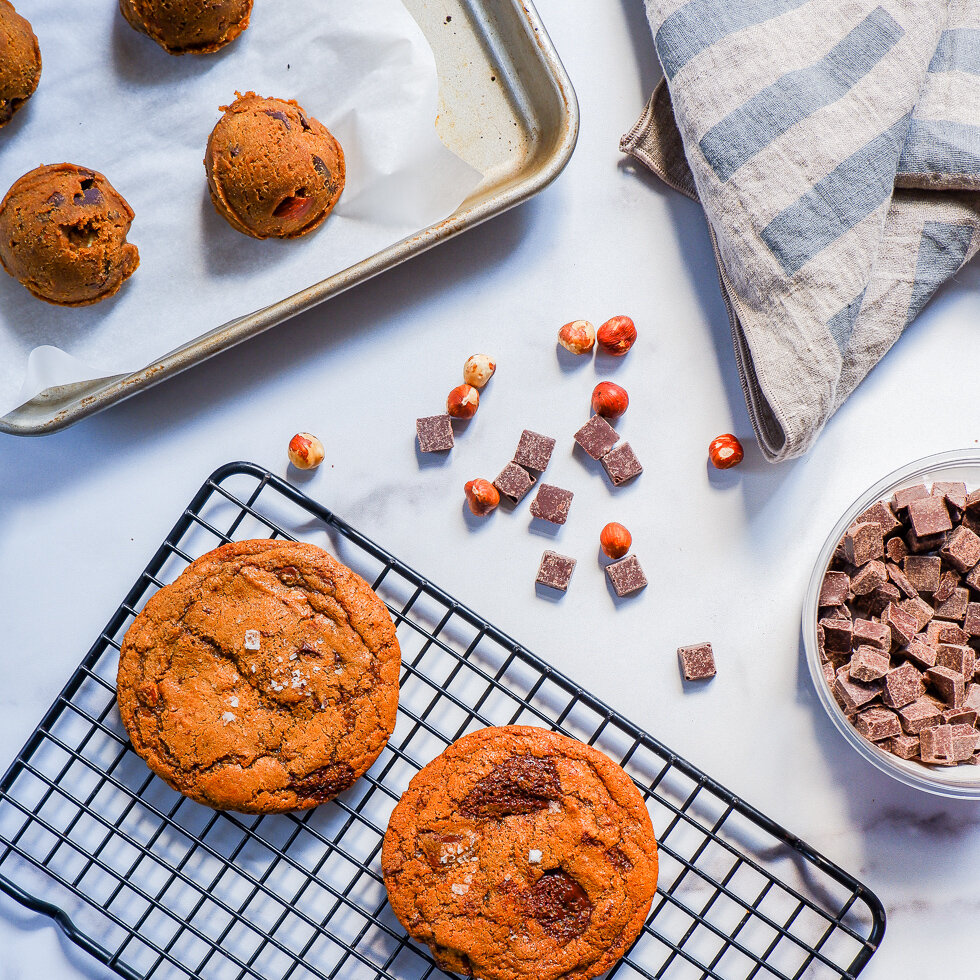
Mix of Chocolates
Why use one type of chocolate when you can use 3? It is very easy to just dump in a bag of chocolate chips, but may I suggest buying 3 chocolate bars, chopping them up and adding them to your cookie dough? By chopping a bar up, you get some small pieces that melt into the dough, larger chunks that form a hidden pool of chocolate and a few in between. Now, why not mix up the types too?
I usually will use dark chocolate for chocolate chip cookies: 70% dark chocolate, chopped up. For these cookies I used Taza Chocolate 70% baking bites, chopped 95% dark chocolate from Madecasse and Taza’s Almond Milk Chocolate bar. Whatever chocolate you like, throw them in the mix. Variety is the spice of life.
And now, enough about the ingredients, let’s get to the recipe and one step closer to cookies.
Recipe
175g (1 1/4 cups) gluten-free flour mix (see note above)
20g (2 tbsp) milk powder (optional, but recommended)
1/2 tsp + pinch baking soda
1/2 tsp salt
90g (1 stick to start with) browned butter
40g (about 1/4 cup) tahini
145g (1 cup) coconut sugar (Madhava is my favorite)
20g (about 2 tbsp) molasses
1 large egg
1 large egg yolk
200g (heaped 1 cup) chopped dark chocolate, milk chocolate, whatever chocolates you like
50g (about 1/2 cup) chopped hazelnuts (or whatever nut you prefer)
In a heavy bottom saucepan, place the 1 stick of unsalted butter. Put the saucepan over medium-high heat. Once the butter starts to melt, stir to keep it from burning. The stick will melt, the butter will start to froth and foam. Keep stirring every minute for about 3-4 minutes until the foam on top gets thicker and you start to smell a nutty aroma rise from the pan.
Pour the melted brown butter into a large heatproof bowl; add the tahini and whisk it into the brown butter. Add the molasses and coconut sugar and whisk together; the mixture might begin to separate and look a little funky, but have no fear. Add the egg yolk to the sugar-butter mixture, whisk together and things will smooth out. Add the egg and whisk again to incorporate. Give the mixture a vigorous whisk for 2 minutes until the mixture gets shiny.
Add the dry ingredients to the wet ingredients (not the chocolate just yet) and stir together with a spatula. When the flour is nearly incorporated, add the chopped chocolate and the nuts and finish mixing in the flour. Cover the dough and chill in the fridge for 2 hours. Don’t skip this step, I promise it helps the cookie.
After the dough gets its nap, preheat the oven to 350F and line a baking sheet with parchment paper. Using a 2 tablespoon cookie scoop (or two spoons), plop mounds of dough onto the baking sheet, leaving 2 inches between each.
Bake for 13 to 15 minutes (just until the edges start to brown). Let cool for 15 minutes before pouring a glass of milk and taking a big ole bite.
These cookies keep best covered at room temperature. Also, scoop all the dough, freeze the mounds you don’t bake and then store the dough in an airtight freezer bag. Boom, you have cookies whenever you want them.