
Peanut Butter Blossom Cookies
Dairy-free, gluten-free
When I was a kid, I remember walking downstairs on a Saturday afternoon and finding my dad in the kitchen. He was holding a jar of peanut butter in one hand and a spoon in the other. My dad was just having a moment in the kitchen, eating peanut butter with a spoon. Obviously I started doing the same and I am fairly certain that is when my obsession with peanut butter began.
When it came to holiday cookies, my mom never made peanut butter blossoms. I always had to rely on a friends’ parent to make them and bring them to the class cookie swap or holiday party. I do not know how I have made it to 33 without making peanut butter blossoms until now, but I made them now.
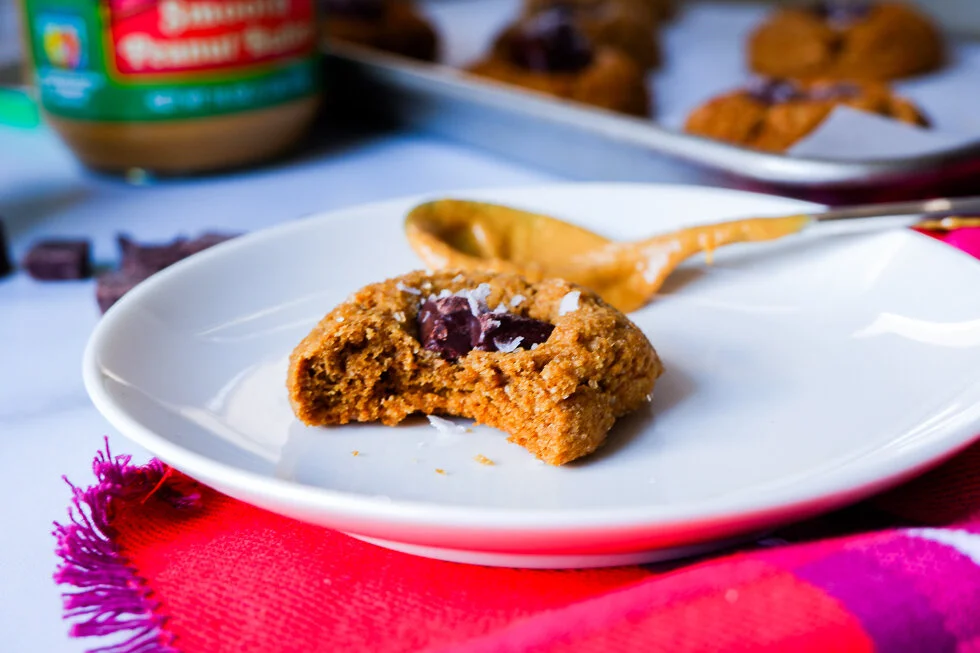
The peanut butter blossoms that I have had were always too dry and crumbly. They would fall away from the chocolate kiss in the center and I would just be left with a little bit of cookie stuck to the bottom of a chocolate. So, making my own, I wanted the cookie to be denser, more moist, but with enough aeration to give the characteristic cracked outside. Also, I did not use those chocolate kisses. I find them to be more like chocolate flavored fat than just chocolate. I used 3 different chocolate varieties, all delicious: dark chocolate squares, halved chocolate coconut candies and halved Emmy’s Organics chocolate-covered coconut cookies. All manage to stay relatively soft, but keep their shape during the baking.
Let’s talk about a few key ingredients and then we can get to baking and, more importantly, eating.
Salted Peanut Butter
In my view, really there is only one peanut butter choice: salted. The joy of peanut butter is the salty-nutty-slight sweetness. Now, when I say salted, I am not talking about the same salt level as you would get from, say, salted peanuts. The saltiness in salted peanut butter helps to just boost the roasted peanut flavor.
I always buy natural, smooth peanut butter that only contains two ingredients: peanuts and salt. While I grew up on JIF peanut butter, in the cold reality of adult eyes, it was not exactly the best for me. For this recipe, I wanted the runny, looser peanut butter; so, do not use the the thicker, ‘no stir’ peanut butter.
Coconut Oil
I wanted to keep this recipe free of dairy so that leaves me to decide between two of my go-to fat choices: olive oil or coconut oil. I love olive oil for so many things, but I really wanted the peanut butter flavor to be the dominant one. Extra virgin olive oil has a fruity, acidic tang that I do love. Refined coconut oil has all the fat, but with a milder flavor albeit a slight sweetness.
Solid coconut oil is the preferred fat for this cookie that I whisked together with the peanut butter as you would cream together soft butter. Using two types of fats (peanut butter and coconut oil) means that you are pretty much guaranteed a moist, soft cookie. We all want a soft cookie.
Almond Flour
Looking at other recipes for peanut butter blossoms, they call for one type of flour: all purpose flour. I could have used a gluten-free all purpose flour, but, again, this can detract moisture. Almond flour inherently has moisture built into it. Since almonds are mostly made of fat, using it in this cookie dough means that you will get a soft, tender crumb and an enhanced nutty flavor.
Make sure that you use superfine almond flour, not almond meal.
Potato Starch
I know that I go on and on about potato starch (we all have our weird obsessions), but it really does make a difference in a cookie, especially a gluten-free cookie. Gluten is an important part of the baking chemistry. It gives body and chew to baked goods; thus, when you remove it from the equation, you need to find a way to replicate it. Adding a starch to a gluten-free flour mixture means that you are going to get that binding quality of gluten, but also the chew.
Potato starch has been the most successful starch for achieving this chew and it is an important part of this cookie. If you are doing a lot of gluten-free baking and want to play around with flour mixes, buy some potato starch (not potato flour).
Ok, I am done rambling. I could probably write pages and pages about ingredients (I am a bit of a nerd that way), but let’s get to the important part: the cookies.
Recipe
150g (1/2 cup) smooth, salted peanut butter
85g (about 1/3 cup) solid, refined coconut oil
135g (135g) coconut sugar
1 large egg
3 tbsp almond milk
112g (3/4 cup) gluten-free oat flour
62g (1/2 cup) almond flour, packed
45g (1/4 cup) teff flour (you can substitute buckwheat flour or more oat flour)
50g (1/4 cup) potato starch
1 tsp baking soda
1/2 tsp salt
Chocolate squares or candies for topping the cookies (I used squares from my favorite chocolate)
1/3 cup coconut sugar for rolling
In a medium size bowl, whisk together the oat, almond and teff flours, potato starch, baking soda and salt. Make sure to get out any lumps in the almond flour. Set aside.
In a large bowl, whisk together the peanut butter and the coconut oil. It might take a bit of whisking to get the coconut oil to break down and blend with the peanut butter. Just a little arm workout in the name of cookies. Add the coconut sugar and egg and whisk again until combined. Add the almond milk and whisk again until smooth.
Add the dry ingredients to the peanut butter mixture and mix with a spatula to incorporate, If the dough seems a little soft, throw it in the fridge for 30 minutes.
Scoop 1.5 tablespoon mounds of dough, roll each in the 1/3 cup coconut sugar to coat and place onto a cookie sheet, leaving about 1.5 inches between each. Use your thumb to create a little dent in the top of each mound of dough.
Bake for 7 minutes, remove from the oven and place a square or two of chocolate in the dent in each cookie. Put back in the oven and bake for another 3 minutes.
Let cool completely before attempting to cram a whole one in your mouth. Or you can be dainty and enjoy one with a mug of hot chocolate.
This recipe makes about 1 dozen cookies. They keep best in an airtight container at room temperature for about a week (unless you eat them all before then).